Category archives: food

Foolproof banana nut bread recipe!

easy banana nut bread recipe

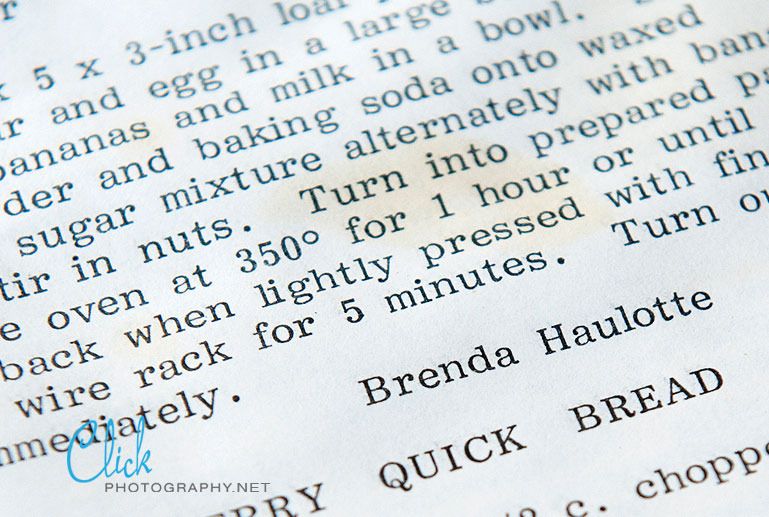
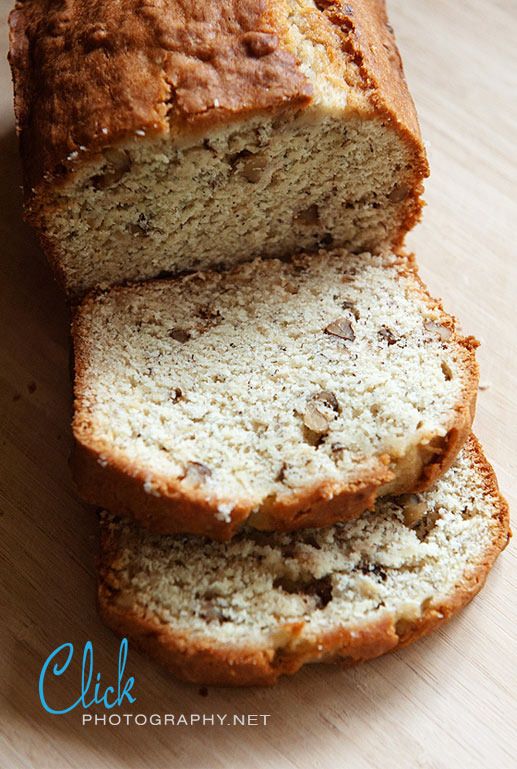
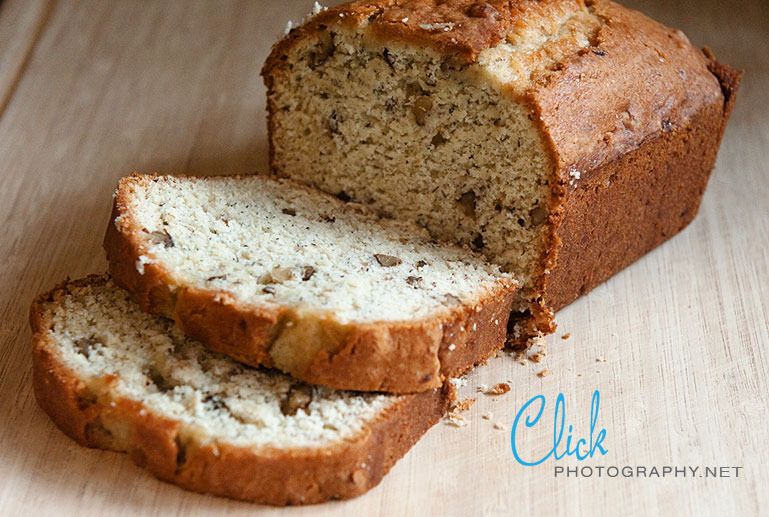
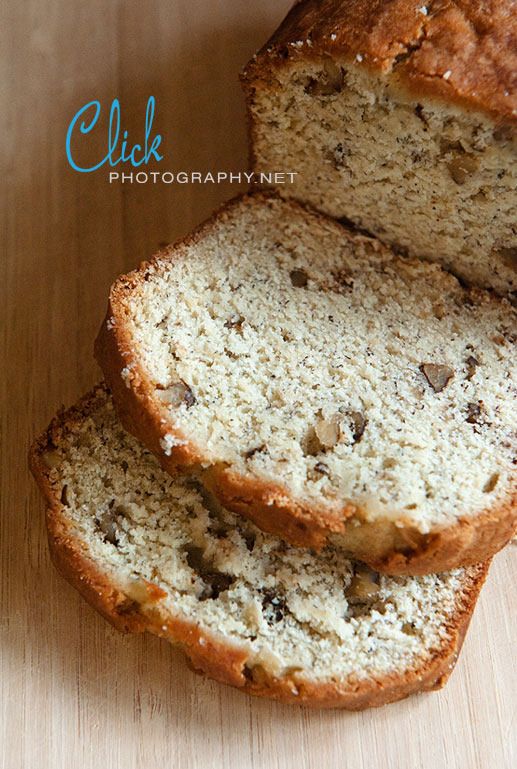
I haven’t done a food post in quite a while! I made some banana bread a couple of days ago, and before we could hork it all down I managed to take a few pictures of it. I thought I’d share the recipe with you — it’s easy and delicious! This recipe actually comes from an old cookbook handed down by my grandmother. If you’ve met me, you know that I’m half Filipino and grew up more or less in the Philippines. But you may not know that I’m also half German! I was born in rural northeast Wisconsin, and my dearly departed grandparents were dairy farmers. (I know, what a crazy upbringing I had!) My grandmother could do anything. Well, she couldn’t drive, but there wasn’t much else she couldn’t do. I adored her. This particular cookbook, which I’ve owned and loved for more years than I can remember, was a fundraiser compiled by The Women’s Auxiliary of the The Wagner Fire Department, and it’s chock full of delicious-but-not-terribly-good-for-you recipes. We’re talking about Wisconsin, after all! Although my grandma’s name appears in many places in the book, the banana nut bread recipe was provided by a Brenda Haulotte. It’s makes a perfectly dense, moist bread that’s delicious in the morning with a schmear of butter and a cup of coffee. Or, have it for dessert with a scoop of vanilla ice cream. Yum!

1 stick of butter, softened
1 cup of sugar
1 egg, beaten
2 cups of sifted flour
1 t. baking powder
1/2 t. baking soda
1 cup of mashed bananas (about two large bananas, the riper the better)
About 3 t. milk
1/2 cup of chopped walnuts
And sometimes I throw in a half cup of chocolate chips, because why not? Or if you prefer, blueberries are a nice addition, too.

Grease a 9 x 5 x 3″ loaf pan and preheat the oven to 350°F. Beat butter, sugar and egg in a bowl until fluffy. Combine mashed bananas with milk in a bowl. Sift flour, baking soda and baking powder onto waxed paper (and if you’re using unsalted butter, throw in a pinch or two of salt). Combine the dry ingredients into the sugar/egg mixture in stages, alternating with the banana/milk mixture. Lastly, stir in the nuts. If your batter is too thick, add some more milk (this is largely dependent upon exactly how mushy those overripe bananas are). You don’t want the batter to be runny like pancake batter, but you don’t want modeling clay either. Turn the batter into the prepared loaf pan and pop it in the oven. Bake it for about an hour, or until the center springs back when lightly touched. After removing your ridiculously delicious smelling banana bread from the oven, let it cool for five minutes or so on a wire rack, then turn it out of the pan. Enjoy! And try not to eat it all at once!

easy banana nut bread recipe easy banana nut bread recipe

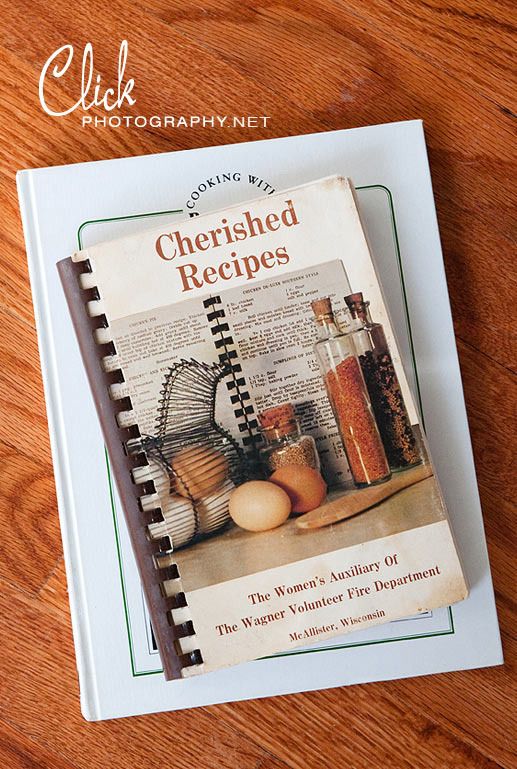
Here’s the old recipe book. Tried and true. And well loved.


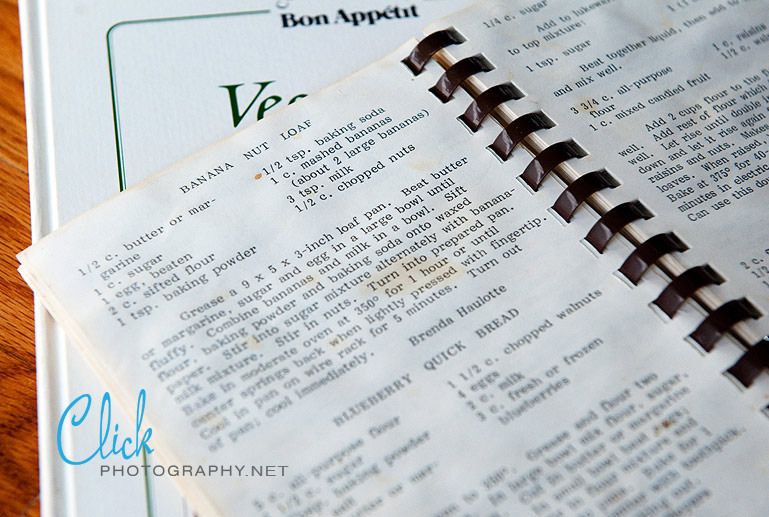
You can tell from all the stains that I’ve used this recipe a lot!

How to make homemade pasta

how to make homemade pasta
I like to do the occasional blog post about cooking. It’s true, I mostly shoot weddings and portraits, but food makes a nice photography subject too. It never moves and never gives me any lip. And you get to eat it, which is nice. ;^)

I enjoy the creative process of cooking but find that my ambition sometimes outweighs my abilities. About three years ago, Pat gave me a traditional pasta maker for Christmas, a gift I had specifically asked for. But upon examining the thing, I found myself too intimidated to use it! It just looked so… complicated. And so it sat in a cupboard for all this time, until my good friend Angie Schwickerath of the Red Rolling Pin volunteered to come over last month and show me how to make homemade pasta. As it turns out, it’s not exactly rocket science. In fact, it was easy! (Kind of like playing with Play-Doh, actually.) There are only two ingredients: flour and eggs. Angie walked me through the slightly-messy-but-very-simple process, and of course I photographed every step of it (except for the photo of me, at the top of this post, which Angie took — I look so serious!). It was a ton of fun, and now I finally know how to use my fancy-schmancy pasta maker! Here’s how it’s done…
how to make homemade pasta
Angie is a professional pastry chef and expert home cook. She’s my kitchen spirit guide. That book she’s holding is Marcella Hazan‘s “Essentials of Classic Italian Cooking”. Angie swears by it.
how to make homemade pasta
You only need two ingredients to make homemade pasta: for each person you’re serving, use one cup of flour (just regular wheat flour, nothing fancy) and one egg. I let the eggs rest outside of the fridge for a couple of hours to come to room temperature. If you don’t have time for that, you can fill a bowl with warm water and let them sit in it for a few minutes.
how to make homemade pasta
You also might want to have one of these all purpose dough scraper thing-a-mabobs on hand. Angie picked this one up for me at Ace Hardware on the way over to my house. I think it was $1.99 and it’s made by Oxo. You can get them practically anywhere that sells kitchen stuff, like K-Mart, Target, Bed Bath & Beyond, et cetera.
how to make homemade pasta
The first step is to dump the flour onto your work surface and make a “volcano”, complete with a “crater” in the middle. Break your eggs right into the crater. Don’t be shy. The volcano won’t mind. [NOTE: do yourself a favor and wear an apron. There is no escaping the fact that you’re going to make a mess. That’s part of the fun.]
how to make homemade pasta
Now grab a fork and whip those eggs! Show ’em who’s boss! You can use your shiny new all purpose dough scraper thing-a-mabob to keep them from running all over. Things may be a little slimy at first, but once the yolks and whites start incorporating into the flour, it all comes together nicely and starts to form a dough.
how to make homemade pasta
Once the eggs and flour have combined, dive in there with your hands and start kneading, folding over and working the dough. You’ll want to keep adding extra flour to your work surface, but don’t worry, it will incorporate itself into the dough as you continue to knead.
how to make homemade pasta
Once the dough has a leathery texture and looks like this, you’re ready for the next step.
how to make homemade pasta
Cut your dough into smaller, manageable sized portions using your shiny new all purpose dough scraper thing-a-mabob. Hopefully you’ve got your pasta maker already assembled and clamped onto your countertop. Set the rollers to the widest setting, and run a chunk of dough through it. Fold the flattened dough in half and run it through again; then repeat this step a few times. Now adjust the setting to the next smallest notch, and run the dough through again, making it even flatter. Now adjust the setting to the next smallest notch, and… you get the idea. Obviously, your dough is going to get flatter and flatter throughout this process. Once it’s flat enough for your tastes, set it aside and start on the next chunk of dough.
how to make homemade pasta
Pretty soon you’re going to have a bunch of Very Flat Dough, and it’ll look like this. While it’s hanging out awaiting its fate, do what Angie’s doing in the background: add the attachment that makes the noodles (I don’t know what it’s called — noodle maker?) onto the pasta maker. Let the Very Flat Dough rest for 10-15 minutes before the next step.
how to make homemade pasta
Now all you have to do is run the Very Flat Dough through the noodle maker part of the machine, carefully catching and guiding it as it comes out the other side.
how to make homemade pasta
Ta-da! Now it’s pasta!
how to make homemade pasta
Hang the noodles on the handy dandy pasta drying rack that your boyfriend also gave you for Christmas ;^) …By the way, it only takes a few short minutes to cook pasta this fresh, unlike the boxed stuff you buy in the store. There is a HUGE difference in the flavor and texture. It’s yummy!
how to make homemade pasta
Angie’s well-worn copy of “Essentials of Classic Italian Cooking”. Marcella Hazan is to Italian cooking as Julia Child is to French cooking.
how to make homemade pasta
The finished product: dinner! Sorry for the lame photo. At this point I was no longer interesting in making photographs. I was interested in eating ;^)

Hope you enjoyed my little tutorial! If you have any questions about the process, leave them in the comments and I will let Angie answer them for you! Ciao!

Pineapple bars, yum!

Colorado Springs portrait and wedding photographers

I am not a food blogger. Nor am I a food photographer. I’m a wedding and portrait photographer in Colorado Springs. But I like to cook and bake, and I have lots of fancy-schmancy cameras and lenses and photography know-how, so hey, why not? And, let’s face it, I’ve lately become as addicted to Pinterest as you, so now I feel like I have to photograph every second of my creative endeavors. (Here I am! Follow me!)  So the other day when I had a hankering for pineapple bars, I took pictures of the process, and now here we are.  It was fun! (The best part was eating the fruits of my labor, of course.)

I got this recipe when I was a mere tween, hundreds of years ago, probably from one of my mom’s Ladies Home Journal magazines. I’m pretty sure it was contributed by Hawaiian senator Spark Matsunaga. (Don’t ask me how I remember that, when I can’t even remember what I ate for dinner last night.)  Here is the recipe, with some photos of the process. Happy baking!

PINEAPPLE BARS

1/2 C butter, melted
2 C sugar — but you can reduce the amount of sugar a bit… pineapples are already sweet!
4 large eggs (Note: I find the finished product to be a little eggy — next time I’ll try taking out one of the yolks. This might make them a little fluffier, too.)
1.5 C flour
1/2 t salt
1/2 t baking powder
1 can of crushed pineapples (1 lb. 4 oz.), drained.
1 C chopped walnuts

Cool the melted butter and add sugar. Beat the eggs until thick; cream with butter and sugar.

Sift the flour, salt and baking powder and add to the above, then add the pineapple and walnuts. Mix well. Pour into a greased 13x9x2″ pan and bake at 350F degrees for about 30 minutes. After cooling, sprinkle powdered sugar on top.

Colorado Springs wedding and portrait photographers

Colorado Springs portrait and wedding photographers

Colorado Springs wedding photographers

portrait photographers Colorado Springs

wedding photography Colorado Springs

wedding and portrait photography in Colorado Springs

Colorado Springs wedding photographer and portrait photographer